(0)

    LEGO® Powered Up programming blocks

    The LEGO® Powered Up app features a simple, easy-to-understand programming language that fans of all ages will enjoy learning and experimenting with. It’s based around a core experience any LEGO fan will understand instinctively – stacking blocks next to one another and watching them snap into place.

    Programming blocks come in a range of types and colors to tell you what type of block you’re using.

    Here are some examples of commonly used programming blocks. If you’re not sure what a block does and it’s not listed here, you can try it in the app or see our full programming block guide. Part of the fun of LEGO Powered Up is in the experimentation, play, and learning.

    Pale yellow circle with a triangle inside that indicates to play Yellow Flow Blocks

    Yellow blocks control the flow of your commands. You can use them to start a program, stop a program, pause a program or even loop commands.

    Yellow programming block with a curved left side and a green play arrow.

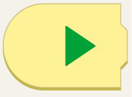
    This block starts the program.

    Yellow programming block with an hourglass. At the bottom left of the hourglass, there is a stopwatch. Beneath the block there is a black checkmark.


    This hourglass block will make the program wait for a specified number of seconds.

    Yellow programming block with an empty space to fit another programming block. On the left of the block is an image of a loop, and in the lower left-hand corner there is a number symbol. Beneath the block is the number 3.

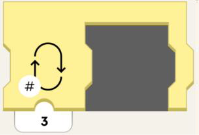
    This block will loop the program section for a set number of times.

    Yellow programming block with an empty space to fit another programming block. On the block, to the right, is a loop with an infinity symbol in the lower left-hand corner.

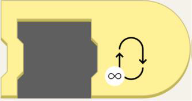
    This block will loop the program forever!

    Orange circle with an orange eye inside. Orange Sensor Blocks

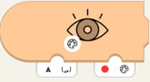
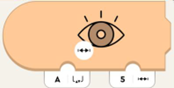
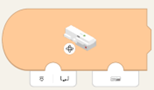
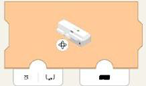
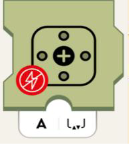
    Orange blocks work with the color and distance sensor, the move hub’s tilt sensor, remote control and WeDo 2.0 sensors. These blocks will trigger an action when a sensor on your model detects something.

    Left-closed orange programming block with eye. On the lower left of the eye is an image of a painter's pallet. Tab on right has red circle next to a painter's pallet. Tab on left has the letter A and a bracket with in and out arrows.

    Use the color sensor to trigger an event when a specific color is sensed.
    Orange programming block with eye. lower left of the eye is an image of a painter's pallet. In the lower right, there's a tab with a red circle next to a painter's pallet. On the left, there's a tab with the letter A and a bracket with in and out arrows.

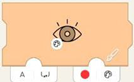
    Wait for the color sensor to detect the color chosen in the block.

    Orange programming block with eye and nub on top. On the lower left of the eye is an image of a painter's pallet. There's a white tab on the bottom with the letter A and a bracket with in and out arrows.

    Get current color measured by the sensor.
    Orange programming block with eye and nub on top. On lower left of the eye is a scale of white to black. There's a white tab on the bottom with the letter A and a bracket with in and out arrows.Get the current ambient light level measured by the sensor.

    Orange programming block with eye. On lower left of the eye is a line with hatch marks. There's a white tab on the bottom left with the letter A and a bracket with in and out arrows. On the right is a tab with 5 and a line with hatch marks.

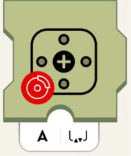
    Triggers when the distance measured by the sensor is less than the specified distance.

    Orange programming block with curved left side and image of Move Hub. On lower left of hub is a rotation symbol. On bottom left tab is an image of hub port and bracket with in and out arrows. Bottom right has tab with image of hub.

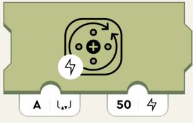
    Use internal gyroscope to trigger an event based on orientation of the hub. Wait for the hub orientation to be equal to hub orientation.

    Orange programming block with image of Move Hub. On lower left of hub is a rotation symbol. On bottom left tab is an image of hub port and bracket with in and out arrows. Bottom right tab has black rectangle.

    Wait for the hub orientation to be equal to hub orientation.

    Green circle with a green propeller image. Green Motor or Movement Blocks

    Green blocks get your model moving! You can differentiate between tacho motors (for controlling speed and position) and basic motors (to drive full speed). 

    Olive green programming block with image of circle and arrows representing turning. On the bottom left of this image is a lighting symbol. Bottom left tab with the letter A and a bracket with in and out arrows. Right tab has number 50 and lightning image.

    Sets power to the motor. Positive numbers rotate clockwise and negative numbers rotate counterclockwise.
    Olive green programming block with motor symbol. On lower left of symbol is red circle with crossed-out lightning symbol. Bottom white tab has the letter A and a bracket with in and out arrows.Removes power from the motor and will slowly stop the motors.
    Olive green programming block with motor symbol. On lower left of symbol is red circle with image of car brake. Bottom white tab has the letter A and a bracket with in and out arrows.Stops the motor.

    Purple circle with purple dial in the middle and little circles all around. Purple Sound and Light Blocks

    Purple blocks can play sounds through your device’s speakers, change the color of the lights on the move hub, color and distance sensors. These blocks also control the lights on the LED-light.

    Blue programming block with sensor light glowing. White tab on the bottom left with the letter A and a bracket with in and out arrows. On the lower right, there's a tab with a red circle next to a painter's pallet.

    Sets the color of the sensor LED.
    Blue programming block with hub light glowing. Lower left tab has number 0. Tab on lower right has blue circle with painters pallet.Sets the hub LED to show color.
    Blue programming block with flashlight symbol. Bottom left white tab has the letter A and a bracket with in and out arrows. Bottom right tab has number and percent symbol.Sets the light brightness on the connected light to the specified port.
    Long blue programming block with flashlight symbol. First tab on lower left has letter A and brackets with in and out arrows.  4 other tabs have zeros.Sets the light brightness on the connectedlight to port (left parameter) but sets the four LED half-circles on the sensor individually.

    From left to right, they affect:
    • right "eye" upper arc
    • left "eye" upper arc
    • right "eye" lower arc
    • left "eye" lower arc
    Blue programming block with house symbol. On lower left of symbol is a volume icon. The below tab has number 2.
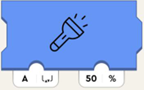
Plays the selected sound from the house sound library.
    Blue programming block with whistle symbol, on lower left of symbol is volume icon. Below tab has number 2. Plays the selected sound from the whistle sound library.
    Blue programming block with train symbol, on lower left of symbol is volume icon. Below tab has number 2. Plays the selected sound from the train sound library.
    Blue programming block with car symbol, on lower left of symbol is volume icon. Below tab has number 2. Plays the selected sound from the car sound library.
    Blue programming block with airplane symbol, on lower left of symbol is volume icon. Below tab has number 2. Plays the selected sound from the plane sound library.
    Blue programming block with dog symbol, on lower left of symbol is volume icon. Below tab has number 2. Plays the selected sound from the dog sound library.
    Blue programming block with cat symbol, on lower left of symbol is volume icon. Below tab has number 2. Plays the selected sound from the cat sound library.
    Blue programming block with whoopie cushion symbol, on lower left of symbol is volume icon. Below tab has number 2. Plays the selected sound from the fart sound library.
    Blue programming block with the horn symbol, on lower left of symbol is volume icon. Below tab has number 2. 
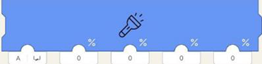
Plays the selected sound from the horn sound library.
    Blue programming block with hand clapping symbol, on lower left of symbol is volume icon. Below tab has number 2. Plays the selected sound from the crowd sound library.
    Blue programming block with robot symbol, on lower left of symbol is volume icon. Below tab has number 2.Plays the selected sound from the robot sound library.
    Blue programming block with raygun symbol, on lower left of symbol is volume icon. Below tab has number 2.Plays the selected sound from the target sound library.

    Teal circle with dark teal joystick inside. Teal Widget Blocks

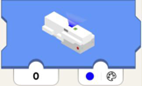
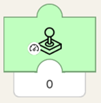
    Teal blocks let you control your model with widgets.

    Green small programming block with nub on top. Has image of button. Tab underneath has number zero.   

    Reports the state (true/false or 0/1) of the Widget Canvas' button widget with Channel-ID (1st parameter).  

    Green small programming block with nub on top. Has slider icon. Tab underneath has number zero.

    Reports the state (true/false or 0/1) of the widget canvas' toggle widget with Channel-ID (1st parameter).
    Green small programming block with nub on top. Has image of directional button, with arrows front, back, left, right. Tab underneath has number zero.Reports the state of the widget canvas' multibuttoned widget with Channel-ID (1st parameter), as an axis. This mean: If the lower button is pressed, it reports -100, if the upper one is pressed, 100. If neither is pressed, 0.
    Green programming block with image of speedometer. Two tabs are on the bottom, the one on the left has letter a, the one on the right has number 0.Instructs the widget canvas' speedometer, integer-display or any other display with Channel-ID (1st parameter) to show the value (2nd parameter).
    Green small programming block with nub on top. Has slider icon with hatch marks inside. Tab underneath has number zero.Reports the position (- 100 to 100) of the widget canvas' slider widget with Channel-ID (1st parameter).
    Green small programming block with nub on top. Has joystick icon on block with image of speedometer in lower lefthand corner. Tab underneath has number zero.Reports the amplitude (- 100 to 100) of the widget canvas' joystick widget with Channel-ID (1st parameter).

    The further away the joystick is pulled from the center, the higher the number will be. In the upper half of the joystick, the numbers reported will be positive. In the lower half, negative.
    Green small programming block with nub on top. Has joystick icon on block with image of steering wheel in lower lefthand corner. Tab underneath has number zero.Reports the angle (normalized to -100 to 100 not in degrees, which would be -90 to 90!) of the Widget Canvas' joystick widget with Channel-ID (1st parameter).

    If the joystick points directly up or down (regardless of amplitude), the block outputs 0. If the joystick's handle is then motioned clockwise, the number become negative and decrease until they reach -100 at directly left or right. If rotated counter-clockwise, the number is positive and increases towards 100.


    If you have any questions about any of the blocks above or need help with anything else, get in touch with us.